Home » Products » Physical Test Equipment » Hardness – Coating Testers » Elcometer 3095 Buchholz Hardness Tester
Elcometer 3095 Buchholz Hardness Tester

Product Description
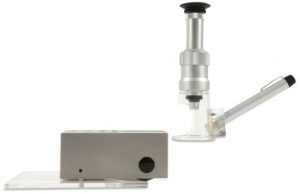
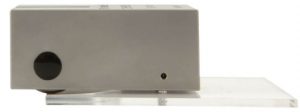
Measuring a coating’s hardness using the indentation method, the Elcometer 3095 Buchholz Hardness Tester consists of a bevelled disc indenting tool which is fitted into a stainless steel block exerting a constant test load of 500g.
The gauge is placed on to the coating and then removed after 30 seconds. The length of any subsequent indentation in the coating is measured using the graduated microscope.
The result is expressed as units of Buchholz Indentation Resistance using the scale provided.
| Measure of Buchholz Hardness | |||
| Indentation Length | Indentation Resistance | Indentation Depth | Minimum coating thickness for which a measurement is valid |
| mm | µm | µm | |
| 0.8 | 125 | 5 | 15 |
| 0.85 | 118 | 6 | 20 |
| 0.9 | 111 | 7 | 20 |
| 0.95 | 105 | 7 | 20 |
| 1 | 100 | 8 | 20 |
| 1.05 | 95 | 9 | 20 |
| 1.1 | 91 | 10 | 20 |
| 1.15 | 87 | 11 | 25 |
| 1.2 | 83 | 12 | 25 |
| 1.3 | 77 | 14 | 25 |
| 1.4 | 71 | 16 | 30 |
| 1.5 | 67 | 18 | 30 |
| 1.6 | 63 | 21 | 35 |
| 1.7 | 59 | 24 | 35 |
|
The Elcometer 3095 Buchholz Hardness Tester can be used in accordance with: • BS 3900 E9* * Standards not in bold have been superseded but are still recognised in some industries |
 |
Specifications
Elcometer 3095 Buchholz Hardness Tester – Specifications
| Part Number | Description | Certificate |
| K0003095M001 | Elcometer 3095 Buchholz Hardness Tester | ο |
| Dimensions | 360 x 310 x 120mm | |
| Weight | 2.9kg |
ο Optional Calibration Certificate available
Packing List
- Elcometer 3095 Buchholz Hardness Tester
- Indentation tool with bevelled disc and two locating pins
- Pin Adjusting Shim
- x20 Illuminated Microscope
- Indentation locator template
- Hexagonal Wrench
- Plastic Carry Case
- Operation Instructions
Data Sheet
Elcometer 3095 Buchholz Hardness Tester – Data Sheet
Elcometer 3095 Buchholz Hardness Tester Data Sheet
Standards
Elcometer 3095 Buchholz Hardness Tester – Standards
The Elcometer 3095 Buchholz Hardness Tester can be used in accordance with:
• BS 3900 E9*
• DIN 53153*
• ECCA T12*
• EN ISO NF 2815
• NF T 30-052*
* Standards not in bold have been superseded but are still recognised in some industries
Accessories
Elcometer 3095 Buchholz Hardness Tester – Accessories
| Part Number | Description |
| KT003095P001 | Spare Pin Supports (x2) |
| KT003095P002 | Bevelled Hardened Steel Disc Indenter |
Instruction Manual
Elcometer 3095 Buchholz Hardness Tester – Instruction Manual
Elcometer 3095 Buchholz Hardness Tester – Instruction Manual
Video
Elcometer 3095 Buchholz Hardness Tester – Video
There are a number of ways to test the hardness of a coating.
The majority of methods use a scratch technique, where a tip is drawn across the surface of the coating to determine the hardness; also known as the “scratch hardness”.
Alternatively, there’s the indentation method, using the Elcometer 3095 Buchholz Hardness Tester; where a known downward force is applied to a formed shape for a predefined timeframe, and the amount of indentation left in the coating is measured.
The Elcometer 3095 Buchholz Hardness Tester includes an indentation tool with bevelled disc and two locating pins, an illuminated microscope, an indentation locating template, a pin adjusting shim, a hexagonal wrench, and an instruction manual complete with measurement lookup tables.
You are also required to time the test, so you could use a stopwatch such as the Elcometer 7300, or you could simply use your phone.
To begin, ensure the locating pins on the indentation tool are level. To do this, place the pins in the pin adjusting shim, use the hexagonal wrench to loosen the screws, until the pins drop down to the surface, and then retighten the screws. Your indentation tool should now be level.
Place your test sample on a flat horizontal surface, then place the indentation locating template on top of it. Then press down firmly, to hold the template in place.
Carefully lower the indentation tool onto the template, supporting pins first, until the pins fit into the two holes on the template. Then lower the indenting tool very gently until the bevelled disc touches the surface of the test panel.
As soon as the bevelled disc touches the surface of the test panel, start the stop watch, and the indentation tool exerts a constant test load of 500g.
After 30 seconds, gently raise the bevelled disc away from the surface, and then remove the indenting tool entirely, taking care not to dislodge the template from its position on the test panel.
Keeping the template firmly pressed down, place the microscope into the rounded shape of the template, with the light source at right angles to the indentation, so you can examine the result. Some Standards [ISO 2815] suggest you should examine the result 35 seconds after the removal of the indentor, unless otherwise specified, so you may want to use the stopwatch to time this.
Adjust the focus, positioning, and rotation of the scale of the microscope until you can see the indentation clearly, and measure it against the scale.
Once you’ve recorded the length, simply use the lookup table provided in the instruction manual to determine the resistance and depth of the indentation.
Standards such as ISO 2815 state that you should repeat the test on different parts of the same test panel, and then calculate the average value. Just make sure the indentation tool fits comfortably on the test panel, for each test.
As the indentation tool, pin adjusting shim, and illuminated microscope are all precision pieces of test equipment; we recommend storing them in the padded carry case provided, once testing is complete.

