Home » Products » Coating Inspection » Surface Preparation » Surface Profiles – Blasted » Rubert 100 Series Heavy Duty Surface Roughness Comparator
Rubert 100 Series Heavy Duty Surface Roughness Comparator

Product Description
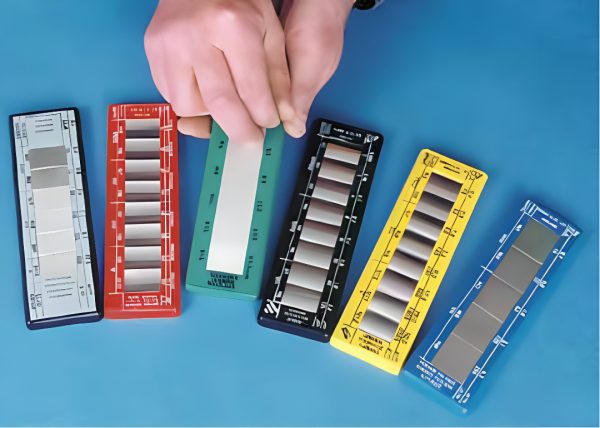
These comparators are intended for heavy duty use in workshop or shop floor environments. Each one consists of between 5 and 8 specimens mounted in a tough nylon frame and protected by a leather wallet. The specimens in each comparator are metal surfaces produced by the same machining process, but with roughness values ranging from the roughest to the smoothest normally obtained by that process. The nominal values are the ones specified in the various standards that describe roughness comparison specimens: BS 2634, ISO 2632, and ASME (formerly ANSI) B46.1
The actual average values of the roughness are well within the tolerances – usually +12%, -17% of the nominal value. The label on the front of the scale states the nominal Ra value in both Microns and Micro Inches. Full details on roughness values are shown below
Applications
Use the comparison specimens to estimate the roughness of a machined surface, in order to select a cutoff value prior to accurate measurement by a stylus instrument (as specified in BS EN ISO 4288). Besides that they also provide valuable guidelines and references which can be consulted during the machining of a part whose roughness has been specified on the drawing.
Method of Use
Comparison specimens are easy to use. Just run a fingernail over your work piece, and then over the specimens. Estimate its roughness by comparing with the scale of specimens.
The Rubert 100 Series Heavy Duty Surface Roughness Comparator can be used in accordance with:
• BS 2634
• ISO 2632
• SME (formerly ANSI) B46.1
Specifications
Rubert 100 Series Heavy Duty Surface Roughness Comparator – Specifications
Range of Roughness Values | ||||
| Item No | Machining Method | No of Patches | Ra (µm) | N-Groups |
| 115 | Surface Grinding | 8 | 0.025 to 3.2 | 1 to 8 |
| 116 | Cylindrical grinding | 8 | 0.025 to 3.2 | 1 to 8 |
| 117 | Flat Lapping | 4 | 0.025 to 0.2 | 1 to 4 |
| Criss-cross / parallel | 4 | 0.025 to 0.2 | 1 to 4 | |
| 118 | Cylindrical lapping + superfinishing | 8 (4+4) | 0.025 to 0.2 | 1 to 4 |
| 119 | Face turning | 8 | 0.4 to 50.0 | 5 to 12 |
| 120 | Cylindrical turning | 8 | 0.4 to 50.0 | 5 to 12 |
| 121 | End Milling | 8 | 0.4 to 50.0 | 5 to 12 |
| 122 | Reaming and drilling | 8 (4+4) | 0.4 to 3.2 1.6 to 12.5 | 5 to 8 7 to 10 |
| 123 | Horizontal Milling | 7 | 0.8 to 50.0 | 6 to 12 |
| 125 | Shaping (planning) | 7 | 0.8 to 50.0 | 6 to 12 |
| 126 | linishing (belt sanding) | 6 | 0.1 to 3.2 | 3 to 8 |
| 128 | Vertical grinding | 6 | 0.2 to 6.4 | 4 to 9 |
| 129 | Grit blasting (angular particles) | 6 | 0.4 to 12.5 | 5 to 10 |
| 58 | Shot blasting (spherical particles) | 6 | 0.4 to 12.5 | 5 to 10 |
| 131 | Spark erosion (EDM) | 7 | 0.4 to 25.0 | 5 to 11 |
| 133 | Hand filing | 5 | 0.4 to 6.4 | 5 to 9 |
| 134 | Castings | 7 | 0.8 to 50.0 | 6 to 12 |
| 135 | Honing | 6 | 0.05 to 1.6 | 2 to 7 |
| 136 | Polishing | 5 | 0.0125 to 0.2 | 0 to 4 |
Data Sheet
Rubert 100 Series Heavy Duty Surface Roughness Comparator – Data Sheet
Rubert 100 Series Heavy Duty Surface Roughness Comparator Data Sheet
Standards
Rubert 100 Series Heavy Duty Surface Roughness Comparator – Standards
The Rubert 100 Series Heavy Duty Surface Roughness Comparator can be used in accordance with:
• BS 2634
• ISO 2632
• SME (formerly ANSI) B46.1
